Jupyter notebook
Have you ever used google colab? Great! Jupyter is that notebook you are using to run your python or other code!
How to open ...
You will get your Jupyter notebook on intranet url https://alisa.uhk.cz. There is running website Jupyterhub where you can start and run your Jupyterlab.
How to log in...
To login into the Jupyterlab, you will need to contact me(email on the menu). I will create your acount.
If you have created your account from Alisa admin (contact in the menu), your mail login with your UHK username and some new super-duper secret password. This password you use for the first login to the Jupyterhub will be stored. So please remember it!
and REMEMBER YOU PASSWORD
Your Jupyter password is not recoverable. If you lose your password, I will need to delete your account and create it from the scratch.
How to use ...
Jupyter notebook is running the chosen kernel on the background. So you can enter the code into your browser and go back at any time. It is generally best for test and renders graphs. If you have some data research on, then the Jupyter is your best friend! I would not recommend you to use the Jupyter for long term computing (days, months, etc.).
More about Jupyter you can reed on official website...
GPU access test
If you are not sure about GPU access, there is a lot of ways to check it. It depends on your preferences. Below are two of my favourite ways.
Tensorflow
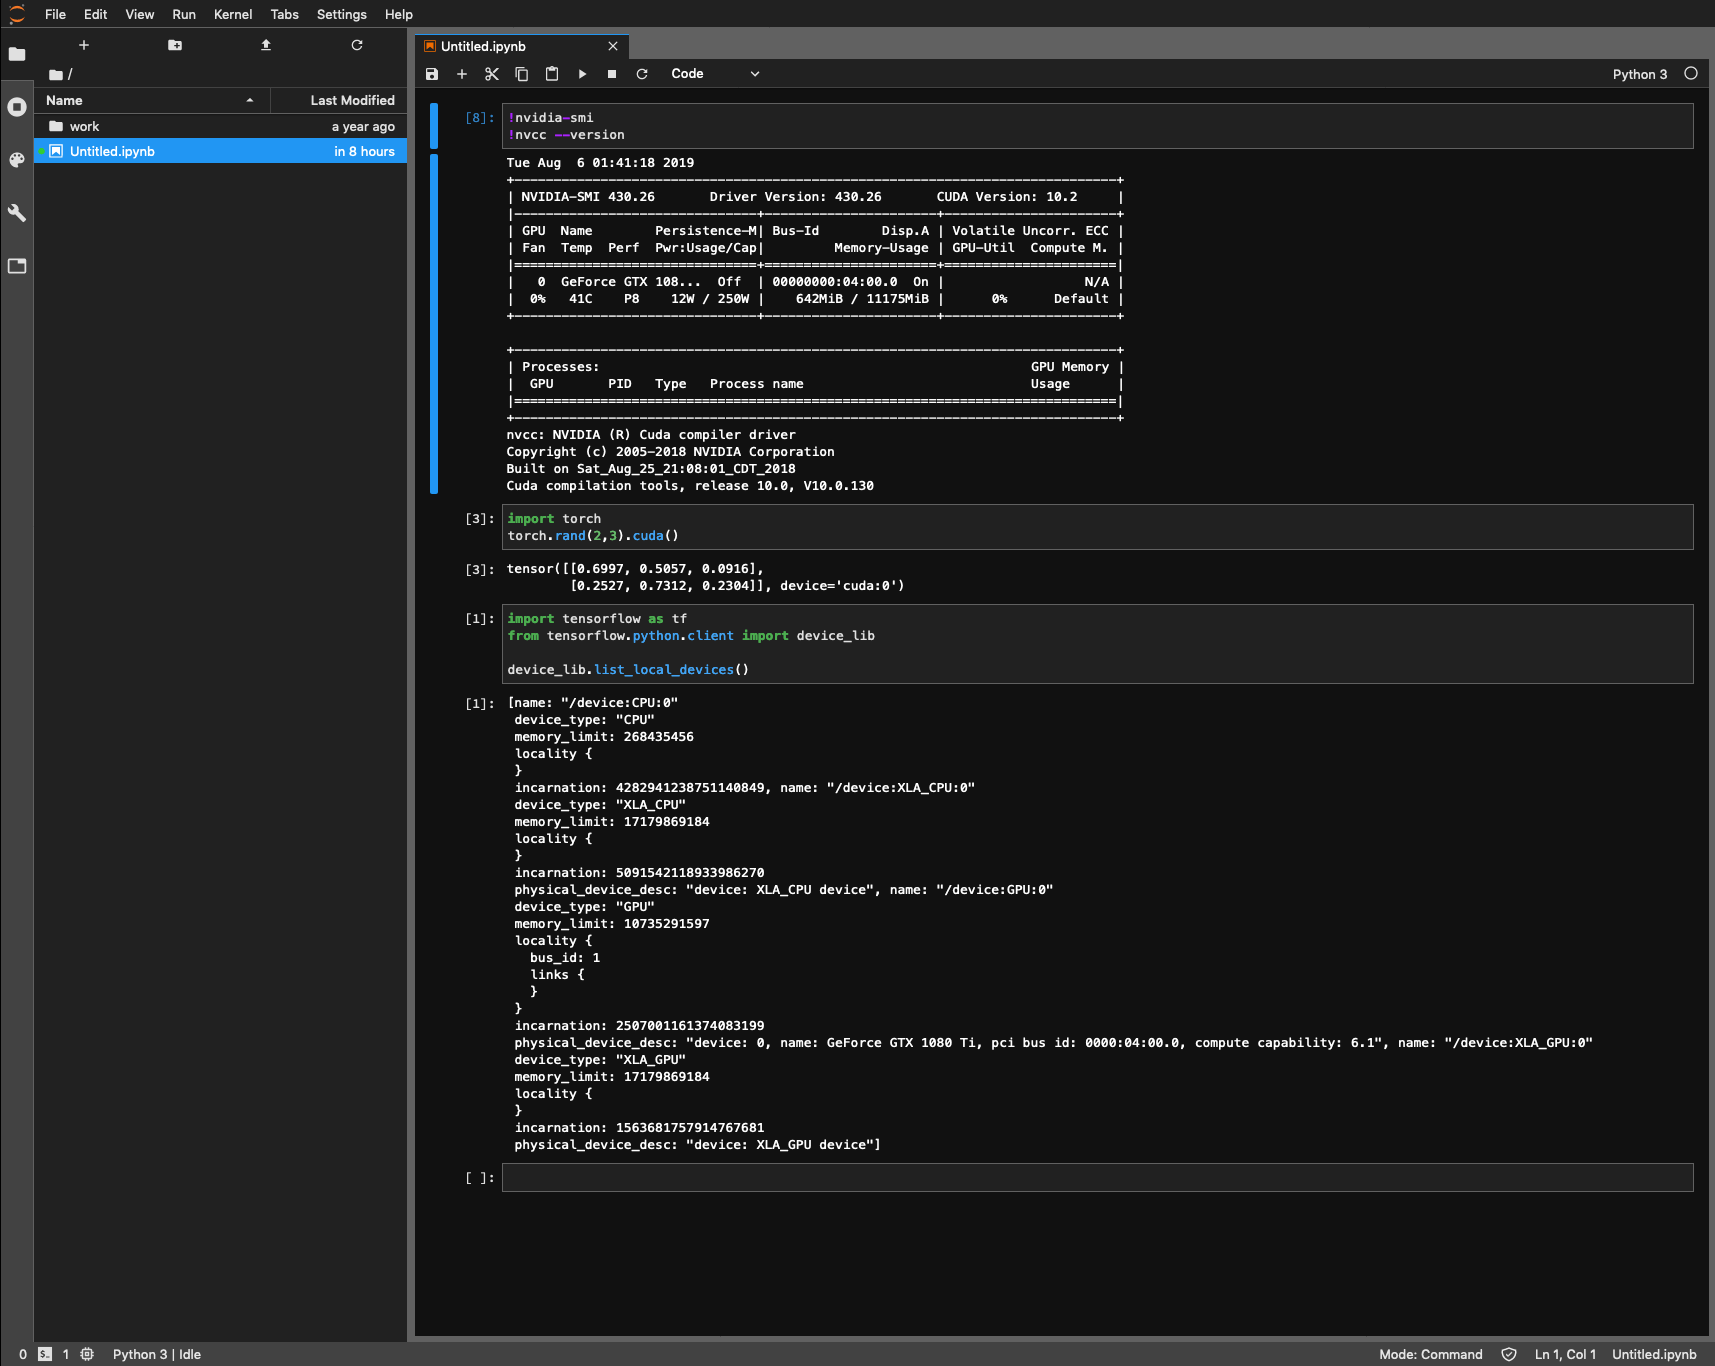
import tensorflow as tf
from tensorflow.python.client import device_lib

device_lib.list_local_devices()
Output:
[
    {
        name: "/device:CPU:0"
        device_type: "CPU"
        memory_limit: 268435456
        locality { }
    },
    {
        name: "/device:XLA_CPU:0"
        device_type: "XLA_CPU"
        memory_limit: 17179869184
        locality {}
    },
    {
        physical_device_desc: "device: XLA_CPU device", name: "/device:GPU:0"
        device_type: "GPU"
        memory_limit: 10735291597
        locality {
            bus_id: 1
            links { }
        }
    },
    {
        incarnation: 2507001161374083199
        physical_device_desc: "device: 0, name: GeForce GTX 1080 Ti, pci bus id: 0000:04:00.0, compute capability: 6.1", name: "/device:XLA_GPU:0"
        device_type: "XLA_GPU"
        memory_limit: 17179869184
        locality {
        }
        physical_device_desc: "device: XLA_GPU device"
    }
]
Pytorch
import torch
torch.rand(2,3).cuda()
Output:
tensor([[0.6997, 0.5057, 0.0916],
        [0.2527, 0.7312, 0.2304]], device='cuda:0')
Scripts
I guess you are familiar with Linux. There is Linux (Ubuntu) in the background of the Jupyterlab. So sometimes you need to know a list of your files. Great news! There is way. You only need to use ! as the first symbol of your command. For instance:
!ls -al
GPU usage
Do you need to know about the availability of visible GPU? Simply use !nvidia-smi!
!nvidia-smi
Output:
Wed Aug  7 22:57:22 2019
+-----------------------------------------------------------------------------+
| NVIDIA-SMI 430.26       Driver Version: 430.26       CUDA Version: 10.2     |
|-------------------------------+----------------------+----------------------+
| GPU  Name        Persistence-M| Bus-Id        Disp.A | Volatile Uncorr. ECC |
| Fan  Temp  Perf  Pwr:Usage/Cap|         Memory-Usage | GPU-Util  Compute M. |
|===============================+======================+======================|
|   0  GeForce GTX 108...  Off  | 00000000:04:00.0  On |                  N/A |
|  0%   39C    P8    12W / 250W |    253MiB / 11175MiB |      0%      Default |
+-------------------------------+----------------------+----------------------+

+-----------------------------------------------------------------------------+
| Processes:                                                       GPU Memory |
|  GPU       PID   Type   Process name                             Usage      |
|=============================================================================|
+-----------------------------------------------------------------------------+
CUDA
You don't know the version of running CUDA? There is probably CUDA v10.0. But to be sure. Just use the command !nvcc --version!
Output:
nvcc: NVIDIA (R) Cuda compiler driver
Copyright (c) 2005-2018 NVIDIA Corporation
Built on Sat_Aug_25_21:08:01_CDT_2018
Cuda compilation tools, release 10.0, V10.0.130
Instaling dependencies
There are generally two ways to install dependencies pip|conda.
pip
pip is classic package manager as you know it from other languages (maven, Gradle, composer, yarn, npm, etc.).
The installation package is as simple as !pip install pandas. Some more command is described in official documentation.
!pip install pandas
WARNING
pip is installing dependencies on your lab LEVEL. You can expect a different dependency version for a different notebook. Then use conda!
List of dependencies and their versions
!pip list
conda
You can need more than is pip capable. For instance, you need another dependency version for two different notebooks. Conda can work with environments. It brings you the possibility of differentiating versions of your dependencies!
installing dependencie
!conda install --yes pandas
List of dependencies and their versions
!conda list
There is great documentation of conda